Reaction Game - Hardware and Code
In this week’s assignment we are going to build a simple reaction game. The game consists of two players who wait for a trigger signal after which the first one to push the button is the winner of the game.
Your kit contains a touch sensor that can act as a button but there is only one. So in order to test your game you’ll have to borrow a touch sensor or a button from one of your fellow students or the staff. During the coming week there will be time for you to go to the PMB and assemble and solder one or two tactile switches from parts available in your Connected Interaction Kit.
Coding Instructions
In this tutorial, you’ll learn how to set up a CircuitPython program to bring your microcontroller, buttons, and LED to life. We’ll guide you through an example designed to match the behavior outlined in the Acting Machine Diagram (shown below). Take your time to study the code and understand how everything fits together.
As you work through the tutorial, you’ll explore key Python concepts such as declaring variables, using loops (while), making decisions with if and elif statements, and defining and using functions. Additionally, you’ll learn to work with the neopixel library to control LED colors, giving your prototype a vibrant and interactive feel.
By the end, you’ll have an understanding of how to run code on your board, how to connect components and a rough idea of how the code is structured.
Game hardware and control flow
The basic game makes use of two input components (either Touch Sensor or Tactile Switch), and a Chainable RGB LED as an output.
| Touch Sensor | Tactile Switch | Chainable RGB/W (ChaiNEO) |
|---|---|---|
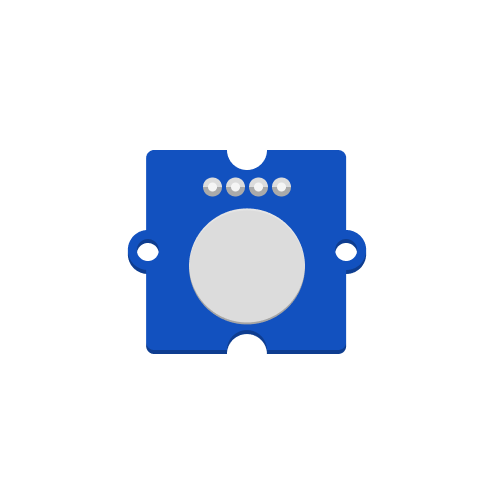 | 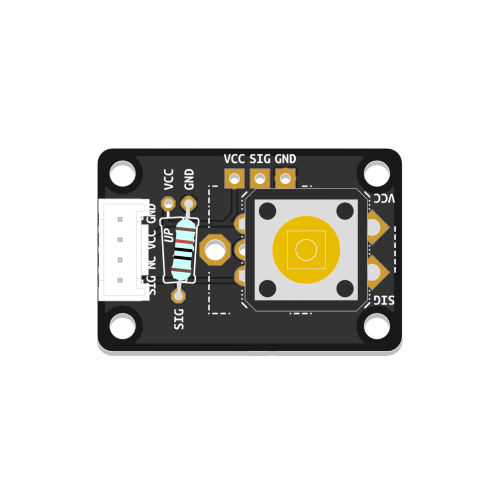 | 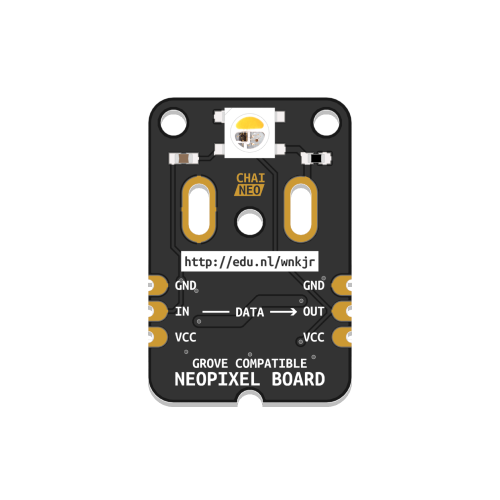 |
Once the LED turns white, both players have to try and touch/press their input as quickly as possible. Whoever is faster wins the round, and the LED will light up in the color of the winner.
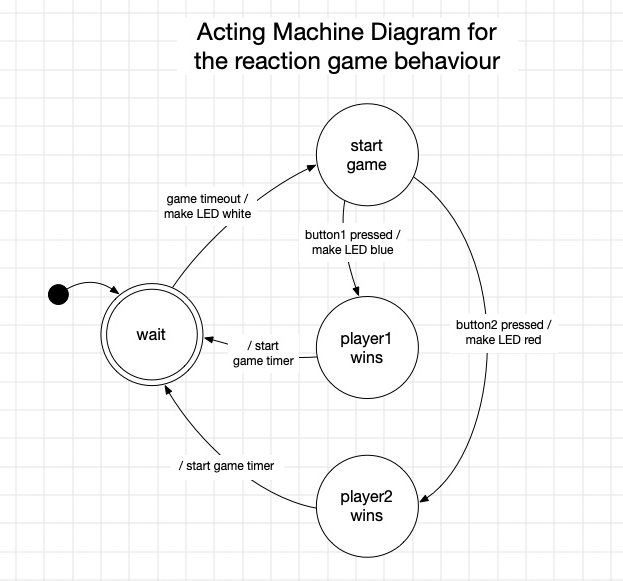
The image above shows the diagram representing the control flow of the game. We will go into more detail about Acting Machine Diagrams later. For now you can already interpret how the control flow if you start in the state (circle) labeled “wait” and then traverse the transitions (arrows) from state to state.
Connecting the cables
Your ItsyBitsy has several connection ports on it. To be sure that your code works properly, you need to make sure that the ports to which you connected your components are the same as those used in your code. your code.
For example, if you connect a component to port D7, you need to use the following code to reference it:
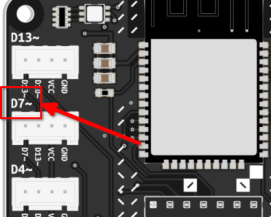 |  |
Code for the game
We provide you with the basic code for the game. When you connect your Pico Expander board to your laptop using a micro-USB cable the device will show up as a USB drive named CIRCUITPY. On this drive there is a file called code.py. Copy the code below into your code.py file and connect all hardware components to have a basic game ready. Look through the code and use the examples from the previous section to deduce where to connect your components! If you want to know more about the workings of the Pico Expander you can visit the Connected Interaction Kit site.
##--- Imports
import digitalio
import board
import neopixel
import time
import random

##--- Variables
state_wait = 0
state_start_game = 1
state_wait_button_press = 2
state_red_wins = 3
state_blue_wins = 4
current_state = 0

# Button variables
red_pin = board.D6
red_button = digitalio.DigitalInOut(red_pin)
red_button.direction = digitalio.Direction.INPUT

blue_pin = board.D8
blue_button = digitalio.DigitalInOut(blue_pin)
blue_button.direction = digitalio.Direction.INPUT

# For the Chainable LED:
pin_leds = board.D10
num_leds = 1
leds = neopixel.NeoPixel(pin_leds, num_leds, auto_write=False, pixel_order=neopixel.GRBW)

led_off = (0, 0, 0, 0)
led_red = (255, 0, 0, 0)
led_blue = (0, 0, 255, 0)
led_white = (0, 0, 0, 255)

# Timer variables
timer_duration = 0
timer_mark = 0

##--- Functions
def set_led_color(color):
    global leds
    leds.fill(color)
    leds.show()

def set_timer(duration):
    global timer_duration, timer_mark
    timer_duration = duration
    timer_mark = time.monotonic()

def timer_expired():
    global timer_mark, timer_duration
    if time.monotonic() - timer_mark > timer_duration:
        return True
    else:
        return False

##--- Main loop
while True:
    if current_state == state_wait:
        set_led_color(led_off)
        set_timer(random.randint(3, 10))
        print("starting game!")
        current_state = state_start_game

    elif current_state == state_start_game:
        if timer_expired():
            print("timer expired, press your buttons!")
            set_led_color(led_white)
            current_state = state_wait_button_press

    elif current_state == state_wait_button_press:
        if red_button.value:
            print("red won")
            current_state = state_red_wins
        elif blue_button.value:
            print("blue won")
            current_state = state_blue_wins

    elif current_state == state_blue_wins:
        set_led_color(led_blue)
        time.sleep(3)
        current_state = state_wait

    elif current_state == state_red_wins:
        set_led_color(led_red)
        time.sleep(3)
        current_state = state_wait
Extra Challenge: Make It Better!
Congratulations on getting the basic version of the game running! Now it’s time to put on your problem-solving hats and improve the game! The code you’ve been working with has a few intentional bugs. One key challenge involves the way button presses are handled:
Hint: If you keep a button pressed before the LED turns white, you’ll always win. That doesn’t sound very fair, does it?
Your task is to identify and fix this bug so the game works as intended. Look through the code and think of how you could achieve this, maybe also penalizing a player if they press the button before the LED turns white!
While improving the game already think about what kind of game you would want it to be and what kind of embodiment would support your imagined style of gameplay. Is it going to be small and table top, will it become a physical challenge, will it have a certain theme? Everything is possible as long as you can imagine and realise it.