Game Controller - Hardware and Code
In this week’s assignment we are going to build and embody a physical controller to control a game on our screen.
Coding Instructions
In this assignment, you’ll learn how to use the usb_hid library to simulate keyboard or mouse inputs with your microcontroller. Remember that when working with keyboards, it’s important to understand how keys are mapped to characters in a specific layout, and that you have the correct layout configured in your code.
Pressing a key once typically produces a single character on the screen. However, holding a key down can result in multiple repeated characters. The usb_hid library lets you simulate these behaviors with commands like keyboard.press(key) to simulate a key press and keyboard.release_all() to release all pressed keys.
In this assignment you’ll also explore Python basics, such as variables, loops (while), conditional statements (if, elif, else), and working with functions. By integrating these concepts with the usb_hid library, you’ll gain the skills to create interactive devices that can simulate keyboard or mouse actions dynamically.
Possible games you can play
These are just some examples of games you can play, and there are many more online (or to download). Your chosen embodiment should fit the game!
- Flappy Bird
- Drift Boss
- Pong Game
- Crazy Flips
- Canabalt
- Any other game that you find fun…
Safe mode
Especially when your ItsyBitsy is sending (wrong) keyboard inputs to your laptop, it can be useful to be able to stop the code from running, while still editing the code. By pressing the reset button right after start-up, while the LED is blinking yellow, the ItsyBitsy goes into Safe mode where it will not execute any of your code.py. You can do this right after plugging it in to your computer, or by pressing the reset button, waiting for the yellow lights, and pressing reset again. This allows you to fix the code without it interfering with your inputs. It will also disable auto-reload, so to start running your code again, you have to press the reset button once more.
Coding Assignment
You will see that different games need different inputs.
Here below we present a template with almost everything you need to make your game controller work. Although, one crucial part is missing, the part inside the while loop.
Your assignment is to use the template code and the acting machine diagram here below to create a working controller.
Before starting, if it’s your first time coding or has been a while since the last time, we created this page that quickly introduces you to some key coding elements: Coding instructions
| Acting Machine Diagram |
|---|
 |
Code template
##--- Library Imports
import time
import board
import digitalio

# We want to emulate a keyboard interface
# To do so we use the usb_hid (Human-interface device) library to send commands to our computer
import usb_hid
from adafruit_hid.keyboard import Keyboard
from adafruit_hid.keyboard_layout_us import KeyboardLayoutUS
from adafruit_hid.keycode import Keycode

##--- Defining states
state_wait = 0
state_button_is_pressed = 1
current_state = 0

##--- Keyboard variables

# Define a new keyboard and set the layout to US (mostly same as the Dutch layout)
keyboard = Keyboard(usb_hid.devices)
keyboard_layout = KeyboardLayoutUS(keyboard)

# We want to send the SPACE key when the button is pressed
# For other keys search online "CircuitPython Keycode"
key = Keycode.SPACE

##--- Button variables

## Define a new button variable and assign it to port D13 of our board
button = digitalio.DigitalInOut(board.D6)

## Define the button as an input component
button.direction = digitalio.Direction.INPUT

##--- Main loop

# Sleep for a bit to allow the host operating system to configure the new USB device
time.sleep(1)

while True:

    # -------------------------------------------------------------|
    #                                                              |
    # Use the Acting Machine Diagram to program your solution here |
    #                                                              |
    # -------------------------------------------------------------|

    # Sleep briefly so keypress events occur at a human time scale.
    # Skilled users can manage ~7 button presses per second, so we
    # sample at roughly twice that rate to satisfy the Nyquist criterion.

    time.sleep(0.07)
If you are struggling with the assignment we provide the solution here below. Attention: Keep in mind that from next week on you won’t find a solution to the assignments, so you should take this opportunity to become familiar with programming concepts and try hard to make the code work.
Jumping straight to the solution might seem tempting, but it’s important to work through the assignment on your own first. By skipping ahead, you’ll miss out on learning critical concepts and skills that are essential for the next stages of the course.
Extra Challenge 1: Control your mouse!
In this week’s extra challenge you’ll explore how to use the usb_hid library to control mouse movements and simulate clicks.
Here we propose a brief introduction on how to use the mouse functions from the usb_hid library:
Key Functions for Mouse Control
Mouse Clicks
- Use
mouse.press(button)to simulate pressing a mouse button (e.g.,Mouse.LEFT_BUTTONfor the left button orMouse.RIGHT_BUTTONfor the right button). - Use
mouse.release(button)to simulate releasing the button. - To ensure all buttons are released, use
mouse.release_all().
Moving the Mouse
- Use
mouse.move(x=amount, y=amount)to move the mouse pointer:- The
xparameter controls horizontal movement (positive for right, negative for left). - The
yparameter controls vertical movement (positive for down, negative for up).
- The
Scrolling
- Use
mouse.move(wheel=amount)to simulate scrolling the mouse wheel. Positive values scroll up, and negative values scroll down.
Your Challenge
The previous section shows how to handle button inputs and control the mouse. Use it to try and implement your own logic to play different games from the ones listed.
Have fun with this challenge, and don’t hesitate to test out creative ideas! The more you experiment, the more you’ll understand how to bring your prototypes to life.
If you’re lost check the state diagram below for some inspiration on how to structure your code!
| Acting Machine Diagram |
|---|
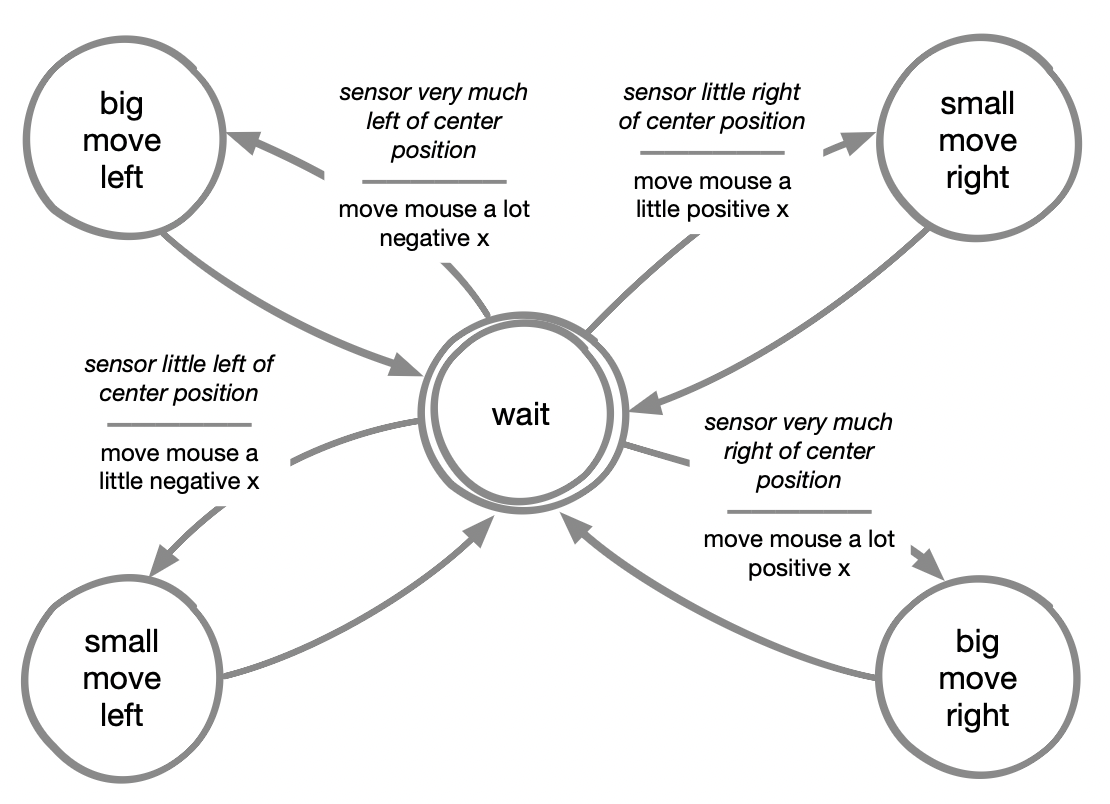 |
Extra Challenge 2: Use an IMU sensor as input!
This IMU (Inertial Measurement Unit) can measure both linear acceleration and angular velocity. It also senses gravity, which makes it possible to determine the device’s orientation relative to the world. Unlike simple digital sensors that only return a 0 or 1, the IMU outputs continuous (“analog”) values. Acceleration is measured in a range of −16 g to +16 g, and angular velocity in a range of −2000 dps to +2000 dps. Because it can track movement and orientation, this type of sensor enables a wide range of possibilities for creative game input devices.
| IMU Sensor |
|---|
 |
Your Challenge
In the code example below, acceleration is mapped to the mouse pointer. The implementation is minimal but functional. How could you adapt this code to create a fun gameplay experience? Think about issues as smoothing, velocity mapping and input frequency and of course there is always the possibility to map the input on to different outputs (like key presses) or to use the angular velocity as an input. Just play around and see what gives a fun result.
Code template
##--- library imports
import time
import board
import busio
import digitalio
import usb_hid
from adafruit_hid.mouse import Mouse
from adafruit_lsm6ds.lsm6ds3trc import LSM6DS3TRC

##--- object declarations
mouse = Mouse(usb_hid.devices)
imu_i2c = busio.I2C(board.SCL, board.SDA)
sensor = LSM6DS3TRC(imu_i2c, address=0x6b)

while True:
    accel_x, accel_y, accel_z = sensor.acceleration
    print(f"Acceleration: X:{accel_x:.2f}, Y: {accel_y:.2f}, Z: {accel_z:.2f} m/s^2")
    gyro_x, gyro_y, gyro_z = sensor.gyro
    print(f"Gyro X:{gyro_x:.2f}, Y: {gyro_y:.2f}, Z: {gyro_z:.2f} radians/s")

    mouse.move(int(accel_x),int(accel_y))
    time.sleep(0.2)