Setting up MQTT on your ItsyBitsy
After successfully completing Tutorial 4 and connected your ItsyBitsy to the Internet, follow the steps below to establish a basic MQTT connection with our MQTT server.
- Extend your
settings.pyfile and add the entries for the MQTT broker (the server we connect to), be sure to set your username in the parameter called mqtt_clientid (please construct it as Studio[your studio]_YourName). Save the file afterwards.settings = { "ssid" : "TUD-facility", # The wifi we connect to "password" : "replace-with-your-iPSK-String", # Our personal password to connect to Wifi "mqtt_broker" : "ide-education.cloud.shiftr.io", # The MQTT server we connect to "mqtt_user" : "ide-education", # The username for connecting to the server "mqtt_password" : "Sy0L85iwSSgc1P7E", # The password for connecting to the server "mqtt_clientid": "Studio5_Caspar", # The device name we present to the server when connecting }Here’s a simpler version:
- We’ve created a library that helps your microcontroller connect to WiFi, connect to an MQTT broker and takes care of the details of receiving and publishing messages. Download the library using the button below, unzip it, and place the file named
MQTT.pydirectly in thelibfolder on your microcontroller. Don’t put the entire folder inlib- just theMQTT.pyfile itself.
If you followed the tutorial to connect to the wifi replace that code with the one below, otherwise create a new code.py copy the following code.
TUD-facility can sometimes be unreliable, you can choose to use your phone hotspot instead. To do so change
settings.pyand set the ssid to the name of your hotspot and the password to your password.If you’re using an iPhone it is necessary that you turn on the Maximize-Compatibility option in your hotspot settings.
##--- Library Imports
import time
import digitalio
import board

from MQTT import Create_MQTT
from settings import settings

##--- Defining states
state_idle = 0
state_received_value = 1
current_state = 0

# Define variable to save data received from the MQTT broker
last_received_value = 0
device_has_received_new_value = False

##--- MQTT Setup

# Method used when the board receives
# a message from the MQTT server.
def handle_message(client, topic, msg):
    global last_received_value
    global device_has_received_new_value

    # Assign message received to last_received variable
    last_received_value = msg

    device_has_received_new_value = True

# You can find the client Id in the settings.py this is used to identify the board
client_id = settings["mqtt_clientid"]


# <-------------------------------------------->
# --     CHOOSE YOUR LISTEN TOPIC HERE        --
# VVVVVVVVVVVVVVVVVVVVVVVVVVVVVVVVVVVVVVVVVVVVVV

# Here you can choose what topic you want to subscribe to. The default is Perlin Noise.
# Make sure there is only one topic active at any given time (and otherwise add a # before the one you do not want to use anymore)

MQTT_topic = "perlin"
#MQTT_topic = "iss/distance"
#MQTT_topic = "iss/location"
#MQTT_topic = "coffee-waiting-line"
#MQTT_topic = "windspeed"
#MQTT_topic = "temperature"

# ^^^^^^^^^^^^^^^^^^^^^^^^^^^^^^^^^^^^^^^^^^^^^^
# <-------------------------------------------->

# Create a mqtt connection based on the settings file.
mqtt_client = Create_MQTT(client_id, handle_message)

# Listen for messages on the topic specified above
mqtt_client.subscribe(MQTT_topic)


# --- Main loop
while True:
    # This try / except loop is used to continuously get new data from MQTT, and reset if anything goes wrong
    try:
        mqtt_client.loop(0.1)

    except (ValueError, RuntimeError) as e:
        print("Failed to get data, retrying\n", e)
        mqtt_client.reconnect()
        continue
    # ---------------------------------------------
    # ^ DO NOT CHANGE ANYTHING ABOVE THIS POINT ^ |
    # ---------------------------------------------

    # ----------------------------------------------------------------|
    #                                                                 |
    # Use the Acting Machine Diagram to program your solution here    |
    #                                                                 |
    # ----------------------------------------------------------------|

    # Example to print the received data - you may want to use this for your code solution
    if device_has_received_new_value == True:
        print(last_received_value)

    # ----------------------------------------------
    # v DO NOT CHANGE ANYTHING BELOW THIS POINT v  |
    # ----------------------------------------------
    device_has_received_new_value = False
    time.sleep(0.01)
If you’re trying to use the value received from MQTT for calculations, you might encounter the following errors.
- TypeError: unsupported operand type(s) for +: ‘int’ and ‘str’
- TypeError: cannot concatenate ‘str’ and ‘int’ objects
That’s because the received value is in the form of text (string in python), so we need to convert it before we use it.
- You can convert it to a whole number using:
last_received_value = int(last_received_value)- Or to a decimal number using:
last_received_value = float(last_received_value)
Acting Machine Diagram
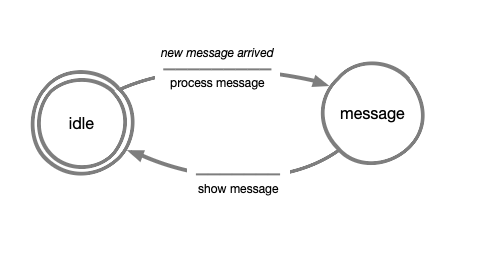
- With the code above we connect to an MQTT client, specify the topic and listen to the data being sent to it. If you want to process the data received you can use the
last_received_valuevariable in thewhile Trueloop.
In the next page we show some useful functions on how to process the data received.
Extra Challenge: Use Advanced Components
Now that you have successfully managed messages from MQTT, you can push your project further by incorporating additional components beyond the standard Connected Interaction Kit. This challenge encourages you to explore and integrate elements that can enhance the interactivity and visual appeal of your design.
Below are some components you can experiment with:
- LED Strip (WS2812 / Neopixel)
- LED Ring
- LED Segment Bar
- LCD Screen
- Speaker / MP3 Player
- Fans
A basic introduction on how to use these components can be found here below:
Complete Prototyping Components List
Be creative and experiment! This challenge is about exploring new possibilities and applying what you’ve learned to enhance your project. 🚀