Walkie-Talkie - Hardware and Code
This week you’ll build a small device that can send messages to someone else’s device. The message can be as simple as a single buzz, or something more structured—like a sequence in Morse code. We’ll use MQTT (a lightweight messaging protocol commonly used in Internet of Things projects) to send your message to a server. Once your message is published to the server, someone else can subscribe to your topic and receive it on their device.
What you’ll do
- Publish a message from your device to an MQTT broker (server)
- Subscribe to someone else’s topic to receive their messages
- Design a message format (e.g., short buzz patterns or Morse-like timing)
Before we begin
For this week’s assignment, we prepared a lot of different code snippets to help you along. They are meant for you to use and modify for your specific design and device. Simple copy-pasting without at least a rough understanding of what you are copying will not work!
Although we will use a lot of code, you are not required to understand every little line, but rather analyze your needs and search for the specific code sample.
As a prerequisite for this tutorial to work, make sure you followed and successfully completed Tutorial 4 of the Connected Interaction Kit website and connected your ItsyBitsy to the internet.
After connecting to the internet the next step is to download the MQTT library and move it to the /lib folder on your CIRCUITPY drive. Next we are going to update the settings.toml file in order to connect to the MQTT server. Open de settings.toml file in a text-editor (unfortunately mu-editor cannot open it).
CIRCUITPY_WIFI_SSID = "TUD-facility"      # name of your wifi
CIRCUITPY_WIFI_PASSWORD = " "             # your iPSK code

DEVICE_ID = " "                           # Unique client ID for your device
BROKER = "ide-education.cloud.shiftr.io"  # MQTT Broker URL
MQTT_CLIENT_ID = "ide-education"          # MQTT Username
MQTT_PASSWORD = "slpfhrGJNqRgA7Qw"        # MQTT Password
MQTT_PORT = 1883                          # Default MQTT Port
Extend your settings.toml file with the entries for the MQTT server and fill in your iPSK code and your device id.
Coding Instructions
When connected to an MQTT broker, a device can subscribe to a topic to receive data, and publish to a topic to send data. Publishing sends a message to the broker, which then forwards it to all devices that are subscribed to that topic.
Coding Assignment
Your goal is to implement 2 buttons and an actuator of your choice (we recommend either a piezo buzzer or a vibration motor), in the following way:
- 1 button dedicated to opening the walkie-talkie channel
- 1 button to send messages on the channel
- 1 actuator that is triggered when a message is received
Remember that walkie-talkies cannot receive messages while their channel is open.
Just like last week, below we present a template with almost everything you need to make your walkie-talkie work.
Although, one crucial part is missing, the part inside the while loop, you should use the acting machine diagram below the code to make your walkie-talkie work.
Happy coding!
Code template
##--- Library Imports
import time
import digitalio
import board
import neopixel
import os

from MQTT import Create_MQTT

##--- Defining states
state_idle = 0
state_receive = 1
state_channel_open = 2
state_transmit = 3

current_state = 0

# Define variable to save data received from the MQTT broker
last_received_value = 0

##--- Button variables
open_channel_pin = board.D6
open_channel_button = digitalio.DigitalInOut(open_channel_pin)
open_channel_button.direction = digitalio.Direction.INPUT

speak_channel_pin = board.D8
speak_button = digitalio.DigitalInOut(speak_channel_pin)
speak_button.direction = digitalio.Direction.INPUT

##-- Led variables
pin_leds = board.D10
num_leds = 1
leds = neopixel.NeoPixel(pin_leds, num_leds, auto_write=False, pixel_order=neopixel.GRBW)

led_off = (0, 0, 0, 0)
led_red = (255, 0, 0, 0)
led_blue = (0, 0, 255, 0)
led_green = (0, 255, 0, 0)
led_white = (0, 0, 0, 255)

def set_led_color(color):
    leds.fill(color)
    leds.show()

##--- Actuator variables
actuator = digitalio.DigitalInOut(board.D12)
actuator.direction = digitalio.Direction.OUTPUT

# For more information on how to use PWM check this link:
# https://id-studiolab.github.io/Connected-Interaction-Kit/components/piezo-buzzer/piezo-buzzer.html#define-a-tone-using-pulse-width-modulation-pwm

#actuator = pwmio.PWMOut(board.GP14, variable_frequency=True)

##--- MQTT configuration
device_has_received_new_value = False

def handle_message(client, topic, msg):
    global last_received_value
    global device_has_received_new_value
    last_received_value = msg
    device_has_received_new_value = True


# Client id from settings.toml via environment
client_id = os.getenv("DEVICE_ID")
if not client_id:
    raise RuntimeError("settings.toml is missing DEVICE_ID")

# Create MQTT connection (returns client + safe loop timeout)
mqtt_client, mqtt_loop_timeout = Create_MQTT(client_id, handle_message)

# <-------------------------------------------->
# -- DEFINE YOUR SPEAK AND LISTEN TOPIC HERE --
mqtt_speak_topic = "Studio05-YourName-WalkieTalkie"
mqtt_listen_topic = "Studio05-PartnerName-WalkieTalkie"
# <-------------------------------------------->

mqtt_client.subscribe(mqtt_listen_topic)

##--- Main loop
while True:
    try:
        # IMPORTANT: loop timeout must be > socket_timeout
        mqtt_client.loop(timeout=mqtt_loop_timeout)

    except (ValueError, RuntimeError) as e:
        print("MQTT error, reconnecting:", e)
        try:
            mqtt_client.reconnect()
        except Exception as e2:
            print("Reconnect failed:", e2)
            time.sleep(2)
        continue

    # ---------------------------------------------
    # ^ DO NOT CHANGE ANYTHING ABOVE THIS POINT ^ |
    # ---------------------------------------------

    message = "ping"

    # Use this method to publish messages on a topic:
    # mqtt_client.publish(mqtt_speak_topic, message)

    # ----------------------------------------------------------------|
    #                                                                 |
    # Use the Acting Machine Diagram to program your solution here    |
    #                                                                 |
    # Hint: Use of the "device_has_received_new_value" variable       |
    #       Use the open_channel_button and speak_button variables    |
    #       Use the led variable (copied from the reaction game code) |
    # ----------------------------------------------------------------|


    # ----------------------------------------------
    # v DO NOT CHANGE ANYTHING BELOW THIS POINT v  |
    # ----------------------------------------------
    device_has_received_new_value = False
    time.sleep(0.1)
| Acting Machine Diagram |
|---|
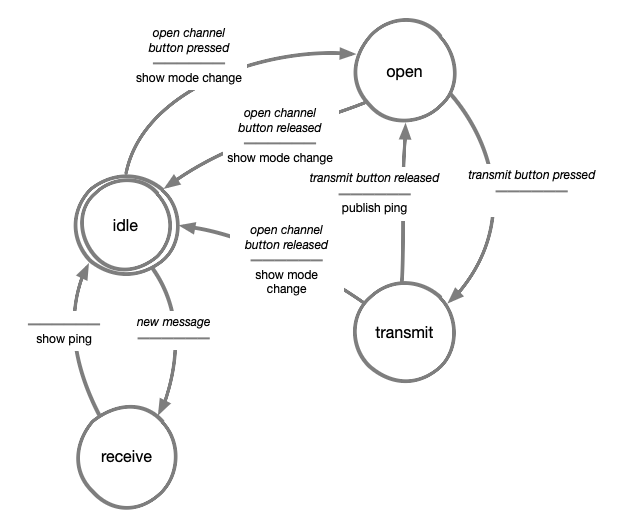 |
Understanding Speak and Listen Topics
In the code, you’ll find two variables called mqtt_speak_topic and mqtt_listen_topic. You can use them to establish communication between walkie-talkies.
Speak Topic = where you send messages
Listen Topic = where you receive messages
For two devices to communicate:
- Your speak topic must be your partner’s listen topic
- Your listen topic must be your partner’s speak topic
Example:
Your Device:
- Speak Topic: "Studio05-YourName-WalkieTalkie"
- Listen Topic: "Studio05-PartnerName-WalkieTalkie"

Partner's Device:
- Speak Topic: "Studio05-PartnerName-WalkieTalkie"
- Listen Topic: "Studio05-YourName-WalkieTalkie"
Note: Topics must match exactly, including capitalization!
Extra Challenge: Interpret received messages
In the current assignment, your walkie-talkie sends a fixed message (“ping”) each time you press the button. But real communication isn’t just about sending the same thing over and over; messages can carry different meanings!
For this challenge, modify your code so that different messages can be sent instead of always sending “ping”. Think about the different ways in which you could send different messages, for example, assign two buttons or create a switch to select messages before sending.
When receiving messages, be sure that your walkie-talkie also interprets incoming messages and responds differently based on their content.
Think about how this could enhance the interaction, different messages could trigger different responses from the actuator, maybe also triggering different actuators.
Push yourself to explore how MQTT can be used for more dynamic communication!
Here below we provide a more advanced acting machine diagram to help you create your improved walkie-talkie
| Acting Machine Diagram |
|---|
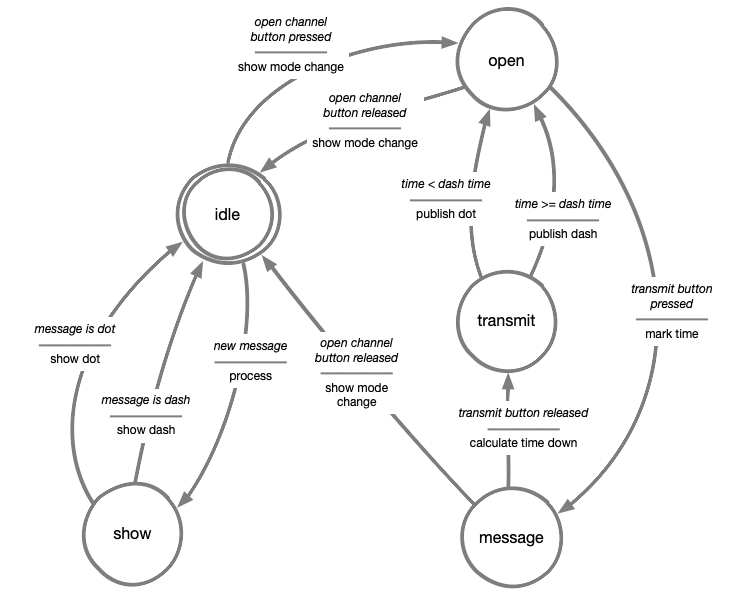 |